Tuesday 29 January 2019

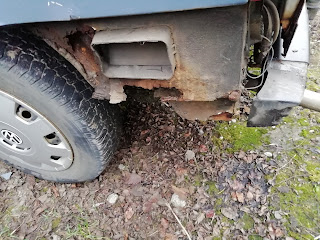
More rust

I thought I was looking at a simple finish to the wheel arch and the front corner. But I ended up cutting more back down the nearside. The seats and the cab carpet are out luckily the cab floor is sound, though it looks like I will have to complete the repairs back to the end of the sliding door step.
Fuel tank out next though.


Sunday 20 January 2019

Breaking news

I had a post on windscreen removal such are my IT skills I managed to delete it.
At some point I'll do another write up.

The LDV passed its MOT with one advisery...slight play in a kingpin. Thats normal for an LDV.

I have to get that one aired and tidied up inside ready for the spring.

Everything was really wet at the end of last season and the chinese diesel heater packed up so I need to get that one replaced.

Onward and upward

Left (nearside) front inner wing repair

I finally finished cutting out all the rust on the inner wing. Yay go me!!!
I test fitted the new front crossmember but couldn't get it to fit. I started to panic a little about my chassis member repair.Then I realised that the radiator kept getting in the way so I ended up dropping the coolant and pulling the radiator off.
Next step was to offer up the front crossmember then I could get the outrigger lined up properly. Again this didn't go according to plan. the shape of the light holder was slightly different. I can only assume the new crossmember is of a bolt on wing short nose.
To get me going I hammered it flat. Before it gets painted I'll have to cut the ones off the old one and weld them in place.

Once the cross member was clamp I could then line up the outrigger and tack it in place.
With tha done I could then work on filling up the hole. 
I don't have a access to a metal press so in order to get the shapes and the angles it was going to have to be the patch work quilt approach.
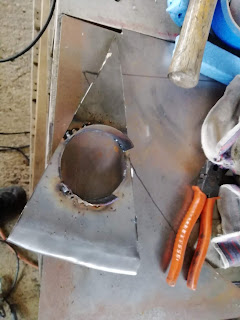
First thing fuel filter housing.


The biggest hole saw I had was 76mm the fuel filter is 80mm in diameter. So I had to work the hole with the power file to get it wide enough. Several belts later and there you go it fits.
Steady and sure wins the race !!!!!
I have been using cereal packet cardboard for the templates. I'm using a combination of new steel left over from a previous project and recycled car panels steel. Depends on the original thickness and my own thoughts on addition strength. The new steel is 1mm thick and the recycled 0.8mm.


Slowly but surely I building up the inner wing.
I kept clamping on the front crossmember and also the new outer wing to make sure nothing moved and everything lined up.


Ijust have the outer wheel arch lip to finish then it is done.
The weld looks a bit rough. I'm using flux core wire with my old Blue Clarke welder. Machine Mart special from more than a few years back. I'm also using old wire that has a bit of a white corrosion layer. I'm getting good penetration so its good and sound and with the flap wheel it will all clean up, but it is extra spattery and in some parts bird poo special.
Once the outer arch is finished, clean up primer, smooth over if needed with a little seam seal then paint.


Sunday 13 January 2019

Rear Bumper removal

I can only work on the van at the weekend, during the week I do the day Job and order parts. The last thing I did today was just go round and have another look at the rust and removed the rear bumper to expose all the horrors there.


Whilst it looks a bit of a mess now, no more surprises found.

https://www.vwheritage.com/vw-t4-transporter-1991-03/vw-t4-panels

It became quite clear I need to get some repair panels.
Currently I have bought the following.

Outriggers
Sills
Rear panels and inner wheel arches
Available front inner wheel arches and outers
New front wings

I spent as much on paint and repair panels as the van cost.
At least when its done it will be solid, still be a fairly cheap so long as you don't factor in my time.


A quick internet search through up VW Heritage. Service is excellent, I am not sure if they are the cheapest but most things are available on their site.


What they don't have I have sourced on ebay.

I also signed up for free membership to the t4 forum.


Loads of advice on would definitely recommend it.


Front end strip down

Removing the windscreen, sorting out the frame and then re-installing the windscreen has been a small victory. Although as a job it probably could have gone further down the list, but I think I am going to need as many small victories as I can get!!
Whilst getting the windscreen sorted I removed the wings. 
The first thing to do is to remove the lights and the front bumper. Along with the grill and the support bar.then unbolt the slam panel from the headlight supports.


Unfortunately once the front came apart I ended up with a really rusted front cross and rusted out in wings and out riggers.


The van has weld on type wings. 4 spot welds across the top of the wings, two on the inside of the door frame and three more down the side of the headlight opening. There should have been more across the wheel arch's but these are rusted through so once all the spot welds were drill the wings fell off.


The bits cut out so far

A quick search on ebay got me a new front crossmember. A little surface rust no rot and 15 minutes up the road. £100 lighter and here it is.


I will use this to keep the front end in line whilst I repair it.I'll paint it before it goes on for the final time.
I got the radiator supported using bungees and it is time to start the cut out and repair. Whilst you can by a lot of the panels the inner wings and the front end of the wheel arches aren't available so I'm going to have to wing it.


Starting on the passenger side I'm starting to remove the rust. You can see the fuel filter lifted out the way. It is a wonder it wasn't dragging on the floor


First thing is to cut back everything to good metal. The end of the chassis member has rusted off so I think this is the first repair.


The next thing to do is get some measurements for chassis to in wing and make a big hole.


The end of the chassis rail is now repaired so the next step is to replace the diagonal out rigger as there is only about 25% left ! I can then use the profile it forms to create a panel to fill in the area above the wheel. Then the bottom of the inner wig and wheel arch can be repaired.

Sunday 6 January 2019

Why have I bought a VW T4 ?!!

I have always avoided VW's. I guess it was the perceived expense, the fact that many of the older ones seemed unreliable. If there is a queue getting into a music festival it is usually due to a type 2 stuck at the side of the road like a beached whale.

I have built several camper vans of the years and have generally avoided the super expensive base options, the current van is an ex Royal Mail LDV convoy van. 

It does the job well and was quite cheap. As with all vans it need some welding. But nowhere near as much as a Transit would !! Running gear is Transit, but the driving experience is somewhat 1950's. Plus it is just that little big for a daily driver and won't quite get into a lot of  carparks being 2.22m tall and 2.22m wide.
Also I'm having a few problems with my joints so it isn't getting any easier to drive. 

The plan was to get something fairly modern and less old bus to drive. I had been looking at Trafic/Vivaro/Primastar vans, but I hadn't seen anything I liked really, especially not in budget. I had also considered a mk6 Transit, but didn't really fancy the welding....(we'll leave that thought hanging). The same with Vito's.

Anyway just before my 46th birthday I was mooching about on Ebay and this popped up.


A cheeky bid and I became the proud owner of a very early T4. 
It must be said with a little bit of bemusement from my wife. Anyway I arranged collection and off we toddled to fetch the van. Mot'd and road legal it all sounded to good to be true. Anyway we got there and Mrs A exclaimed, it's rusty. To which I replied it is cheap. (At this point I can add this thought to my one on welding).

The vehicle was described as well maintained but needing a little TLC as the body work was bubbling and past its best it is a 28 year old vehicle.
It runs and drives, but not to sure about the maintained side of things.
It needs a good service.
On the way home the clutch starting making a rubbing sound with vibration through the pedal when fully depressed, indicating clutch is on it's way out and the release bearing is rubbing.
So once I tackled the body work I was thinking new clutch, full service and cambelt for good measure.

So she is now home ready to start work....and has a name Biały.
Mrs A is Polish and she is almost white.